To use OpenCV fully with Anaconda (and Spyder IDE), we need to:
- Download the OpenCV package from the official OpenCV site
- Copy and paste the
cv2.pydto the Anaconda site-packages directory. - Set user environmental variables so that Anaconda knows where to find the FFMPEG utility.
- Do some testing to confirm OpenCV and FFMPEG are now working.
(Read on for the detail instructions...)
Prerequisite
Install Anaconda
Anaconda is essentially a nicely packaged Python IDE that is shipped with tons of useful packages, such as NumPy, Pandas, IPython Notebook, etc. It seems to be recommended everywhere in the scientific community. Check out Anaconda to get it installed.
Install OpenCV-Python to Anaconda
Cautious Note: I originally tried out installing the binstar.org OpenCV package, as suggested. That method however does not include the FFMPEG codec - i.e. you may be able to use OpenCV, but you won't be able to process videos.
The following instruction works for me is inspired by this OpenCV YouTube video. So far I have got it working on both my desktop and laptop, both 64-bit machines and Windows 8.1.
Download OpenCV Package
Firstly, go to the official OpenCV site to download the complete OpenCV package. Pick a version you like (2.x or 3.x). I am on Python 2.x and OpenCV 3.x - mainly because this is how the OpenCV-Python Tutorials are setup/based on.
In my case, I've extracted the package (essentially a folder) straight to my C drive (
C:\opencv).Copy and Paste the cv2.pyd file
The Anaconda Site-packages directory (e.g.
C:\Users\Johnny\Anaconda\Lib\site-packages in my case) contains the Python packages that you may import. Our goal is to copy and paste the cv2.pyd file to this directory (so that we can use the import cv2 in our Python codes.).
To do this, copy the
cv2.pyd file...
From this OpenCV directory (the beginning part might be slightly different on your machine). For Python 3.x, I guess, just change the
2.x to 3.x accordingly.# Python 2.7 and 32-bit machine:
C:\opencv\build\python\2.7\x84
# Python 2.7 and 64-bit machine:
C:\opencv\build\python\2.7\x64
To this Anaconda directory (the beginning part might be slightly different on your machine):
C:\Users\Johnny\Anaconda\Lib\site-packages
After performing this step we shall now be able to use
import cv2 in Python code. BUT, we still need to do a little bit more work to get FFMPEG (video codec) to work (to enable us to do things like processing videos).Set Environmental Variables
Right-click on "My Computer" (or "This PC" on Windows 8.1) → left-click Properties → left-click "Advanced" tab → left-click "Environment Variables..." button.
Add a new User Variable to point to the OpenCV (either x86 for 32-bit system or x64 for 64-bit system). I am currently on a 64-bit machine.
| 32-bit or 64 bit machine? | Variable     | Value                                |
|---------------------------|--------------|--------------------------------------|
| 32-bit                    | `OPENCV_DIR` | `C:\opencv\build\x86\vc12`           |
| 64-bit                    | `OPENCV_DIR` | `C:\opencv\build\x64\vc12`           |
Append
%OPENCV_DIR%\bin to the User Variable PATH.
For example, my
PATH user variable looks like this...
Before:
C:\Users\Johnny\Anaconda;C:\Users\Johnny\Anaconda\Scripts
After:
C:\Users\Johnny\Anaconda;C:\Users\Johnny\Anaconda\Scripts;%OPENCV_DIR%\bin
This is it we are done! FFMPEG is ready to be used!
Test to confirm
We need to test whether we can now do these in Anaconda (via Spyder IDE):
- Import OpenCV package
- Use the FFMPEG utility (to read/write/process videos)
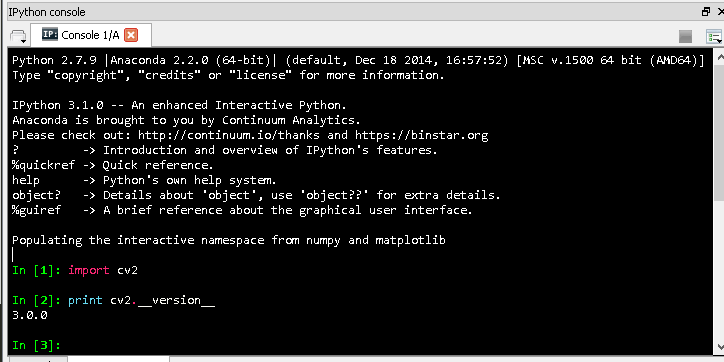
Test 1: Can we import OpenCV?
To confirm that Anaconda is now able to import the OpenCV-Python package (namely,
cv2), issue these in the IPython console:import cv2
print cv2.__version__
If the package
cv2 is imported OK with no errors, and the cv2 version is printed out, then we are all good! Here is a snapshot:
Test 2: Can we Use the FFMPEG codec?
Place a sample
input_video.mp4 video file in a directory. We want to test whether we can:- read this
.mp4video file, and - write out a new video file (can be
.avior.mp4etc.)
To do this we need to have a test Python code, call it
test.py. Place it in the same directory as the sample input_video.mp4 file.
This is what
test.py may look like (I've listed out both newer and older version codes here - do let us know which one works / not work for you!).
(Newer version...)
import cv2
cap = cv2.VideoCapture("input_video.mp4")
print cap.isOpened()   # True = read video successfully. False - fail to read video.

fourcc = cv2.VideoWriter_fourcc(*'XVID')
out = cv2.VideoWriter("output_video.avi", fourcc, 20.0, (640, 360))
print out.isOpened()  # True = write out video successfully. False - fail to write out video.

cap.release()
out.release()
(Or the older version...)
import cv2
cv2.VideoCapture("input_video.mp4")
print cv2.isOpened()   # True = read video successfully. False - fail to read video.

fourcc = cv2.cv.CV_FOURCC(*'XVID')
out = cv2.VideoWriter("output_video.avi",fourcc, 20.0, (640,360))
print out.isOpened()  # True = write out video successfully. False - fail to write out video.

cap.release()
out.release()
This test is VERY IMPORTANT. If you'd like to process video files, you'd need to ensure that Anaconda / Spyder IDE can use the FFMPEG (video codec). It took me days to have got it working. But I hope it would take you much less time! :)
Note: One more very important tip when using the Anaconda Spyder IDE. Make sure you check the current working directory (CWD)!!!
Conclusion
To use OpenCV fully with Anaconda (and Spyder IDE), we need to:
- Download the OpenCV package from the official OpenCV site
- Copy and paste the
cv2.pydto the Anaconda site-packages directory. - Set user environmental variables so that Anaconda knows where to find the FFMPEG utility.
- Do some testing to confirm OpenCV and FFMPEG are now working.
Good luck!
Credits: